The most expensive mistake in a custom plastic bag order is not the artwork or the gauge. It is a size that looked right on the spec sheet and turns out to be an eighth of an inch too tight around the product, or six inches too short to fold and seal. A bag is not sized to the product; it is sized to the product plus the room the product needs to go in, come out, and close. Getting that arithmetic right the first time is what separates one clean order from a reprint.
This walkthrough goes in the order you should actually work: measure the item, understand how bag dimensions are stated, add the correct allowances, and decide whether a flat bag or a gusseted one fits the job.
Start with the product, measured three ways
Before you touch a bag chart, measure the thing going inside it. You need three numbers: the width of the widest face, the depth front to back, and the height. For a soft or stackable product, measure it as it will actually sit in the bag, compressed or folded the way it ships, not laid out flat. A folded stack of shirts and the same shirts spread on a table are two different depths, and the bag has to fit the first one.
Depth is the number people forget. Flat items like a single print or document have almost no depth, so a flat bag works. Anything with bulk, a boxed product, a rolled textile, a stack, pushes the front and back panels apart, and that depth has to be accounted for in both the width and the length of the bag. Skip it and the bag will close but strain at the seams, or it simply will not close at all.
How bag dimensions are actually stated
Flat poly bags are stated as width by length. Width is measured side to side across the opening, and length runs from the bottom seal to the open end. A bag written as 10 by 12 inches is 10 inches across and 12 inches deep, and the film thickness, the gauge, is a separate spec that does not change those two numbers.
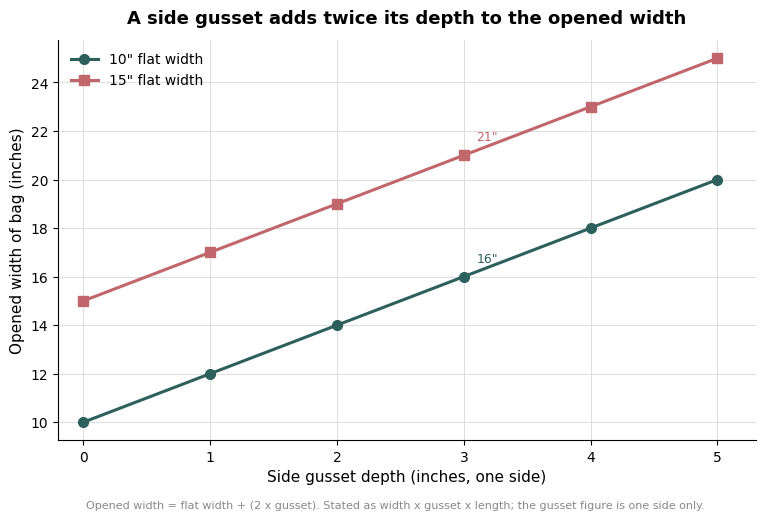
Gusseted bags add a third figure and are stated as width by gusset by length. The catch that trips up first-time buyers is that the gusset number describes only one side of the fold. A bag listed as 10 by 3 by 12 inches has a 10-inch flat width, but when the sides expand, the opened width is the flat width plus twice the gusset, so 10 plus 6, or 16 inches of usable opening. Read the gusset as one side, double it in your head, and you will never over-order width again.
The allowance math that turns a product into a bag size
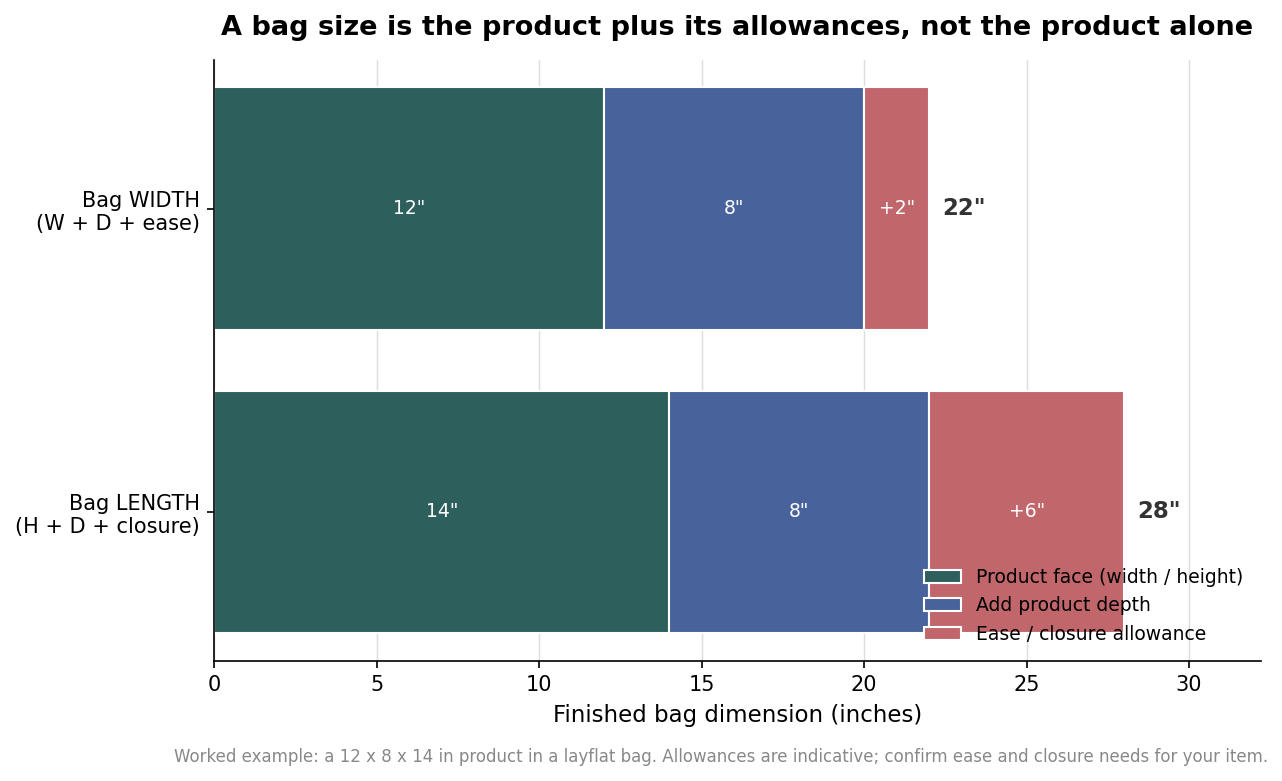
Once you have the product measured, the bag size is a short addition problem. For a squared-off item in a layflat bag, a workable convention is to set the bag width at the product width plus the product depth plus about two inches of ease, and the bag length at the product height plus the product depth plus roughly six inches to fold over and close. The depth appears in both dimensions because the bag has to wrap around the sides of the item, and the closure allowance at the end is what lets you fold, tape, heat-seal, or tie the top without pulling the film tight against the contents.
Work an example. A product measuring 12 inches wide, 8 inches deep, and 14 inches high needs a bag roughly 12 plus 8 plus 2, or 22 inches wide, and 14 plus 8 plus 6, or 28 inches long. Notice how far that finished 22 by 28 bag is from the bare 12 by 14 footprint of the product. The allowances are not padding for safety; they are the difference between a bag that seals and one that splits.
Treat those specific allowances as indicative rather than fixed. A loose retail bag that only needs to be dropped over a product can run tighter, while a liner meant to be gathered and tied shut needs the full closure allowance. Heat-sealed bags need enough lip above the contents for a clean seal bar. If your closure method is a reclosable lip or an adhesive flap, add that lip length on top of the length you calculated, because the flap is not usable space for the product.
When a flat bag is not enough
A flat bag is the right default for thin or flexible goods. As soon as a product has real depth, a gusset earns its place, because it lets the bag expand to a box shape instead of ballooning and wasting film. The same logic scales up to liners. A gaylord or box liner is typically cut to the box width plus about an inch, the box depth plus about an inch, and a length equal to the box height plus the box depth plus around six inches so the liner can be pulled up over the top and closed. The pattern is identical to the small-bag math; only the numbers grow.
Match the gusset to the product depth, not to a round number. If the item is 6 inches deep, a 3-inch gusset opens to accommodate it, since each side contributes half. Order a gusset far larger than the depth and the excess film just folds back on itself; order one too small and the bag pulls taut and distorts your printed panel. The gusset should track the product, the same way the width and length do.
A short checklist before you approve the order
Before a custom bag goes to production, confirm four things in plain numbers. First, that you measured the product as it ships, including its depth. Second, that you read the bag spec correctly, doubling any gusset to picture the real opened width. Third, that your stated bag width and length already include the ease and the closure allowance, so the numbers on the quote are finished bag dimensions and not the product dimensions by mistake. Fourth, that the gauge, which is a separate thickness spec, suits the weight of the contents rather than being an afterthought.
If you can point to each of those four and say what the number is and where it came from, the bag will fit. Sizing a plastic bag is not complicated, but it is unforgiving of a skipped step, and the depth and closure allowances are the two steps most often skipped. Measure the product honestly, add the room it needs, and specify the finished dimensions, and the first sample off the line will be the one you keep.