Category: Uncategorized

  • Food-Grade Plastic Bags: Five Mistakes That Get the Order Wrong

    Food-Grade Plastic Bags: Five Mistakes That Get the Order Wrong

    “Food grade” is one of the most misused phrases in packaging. Buyers assume it is a property every plastic bag automatically has, when in reality it is a regulatory standard a bag either meets or does not. Poly bags that touch food in the United States fall under the FDA’s food-contact rules, and the difference between a compliant bag and a lookalike is invisible on the shelf. Here are the five mistakes that most often turn a routine bag order into a compliance headache or a spoiled product, and how to specify around each one.

    Mistake one: assuming any poly bag is food-safe

    A clear plastic bag is not automatically cleared for food contact. The relevant regulation for most poly bags is FDA 21 CFR 177.1520, which covers olefin polymers, meaning polyethylene in its LDPE, LLDPE, and HDPE forms and polypropylene. A bag made to that standard is manufactured and documented as food-contact compliant; a generic industrial bag off the same type of resin may not be, because compliance is about the whole recipe and process, not just the base plastic. The fix is simple but easy to skip: ask your supplier to confirm in writing that the specific bag meets 21 CFR 177.1520, rather than treating “it’s polyethylene” as the end of the conversation.

    Mistake two: ignoring virgin resin, additives, and black bags

    Food-contact compliance generally depends on using virgin resin from a reputable source, not recycled regrind. Post-consumer recycled content can carry unknown contaminants, so food-grade bags are typically made from virgin polymer unless a recycled stream is specifically certified for food contact. Additives matter just as much. Slip agents, antioxidants, and processing aids have to come from the approved list and stay within specified maximum concentrations, and colorants are their own trap. Black bags are the classic example, because black is often achieved with carbon-black masterbatch and not every carbon-black formulation is food-grade. If you want a colored or printed food bag, confirm the colorants and inks are cleared for the contact you intend, and be especially careful with black. It also helps to keep printing on the outer surface or a non-contact panel so the ink is not sitting against the food, which sidesteps a whole category of migration questions before they arise.

    Mistake three: picking the wrong resin for the temperature

    The resin you choose sets the temperature window the bag can survive, and food moves through a wide temperature range. All the common polyolefins handle refrigeration, but they diverge at the extremes. Polyethylene resins stay flexible deep into freezer territory, which is exactly why freezer and produce bags are usually LDPE or LLDPE rather than polypropylene, which grows brittle in the cold. At the hot end the order flips: HDPE carries a higher continuous-use ceiling than LDPE, and polypropylene tolerates the most heat of the group, which is why it shows up in warm-fill and steamable applications.
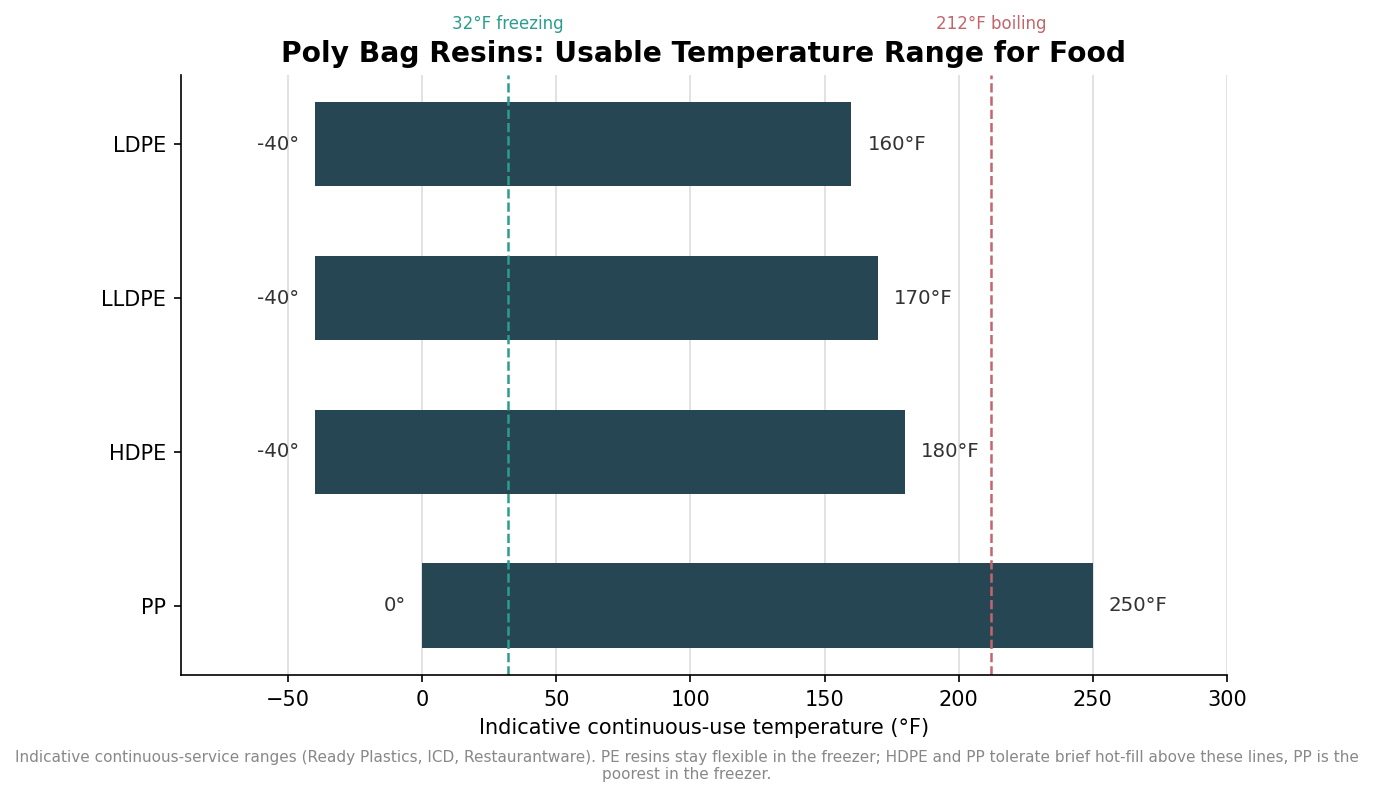
    Floating bar chart of indicative continuous-use temperature ranges: LDPE -40 to 160F, LLDPE -40 to 170F, HDPE -40 to 180F, PP 0 to 250F, with freezing and boiling reference lines
    Indicative continuous-use temperature ranges by resin; PE stays flexible in the freezer while PP tolerates the most heat.

    The practical reading is to match the resin to the coldest and hottest point the bag will actually see. LDPE is comfortable to roughly 160°F in continuous use, HDPE to around 180°F, and both remain usable in the freezer. Under 21 CFR 177.1520, compliant polyethylene can contact non-fatty foods up to boiling temperature, but that is a compliance statement, not a license to steam-sterilize an LDPE bag, which sits above its mechanical service range. If a bag will be frozen and later reheated, say so up front, because no single default resin is ideal at both ends of that swing.

    Mistake four: under- or over-speccing the gauge

    Gauge, measured in mils, is where buyers waste money in both directions. Spec too thin and a freezer bag cracks at temperature or a heavy product punctures the film; spec too thick and you pay for material a produce bag never needed. Food applications sort into fairly predictable gauge bands, and knowing where your product falls keeps the quote honest.
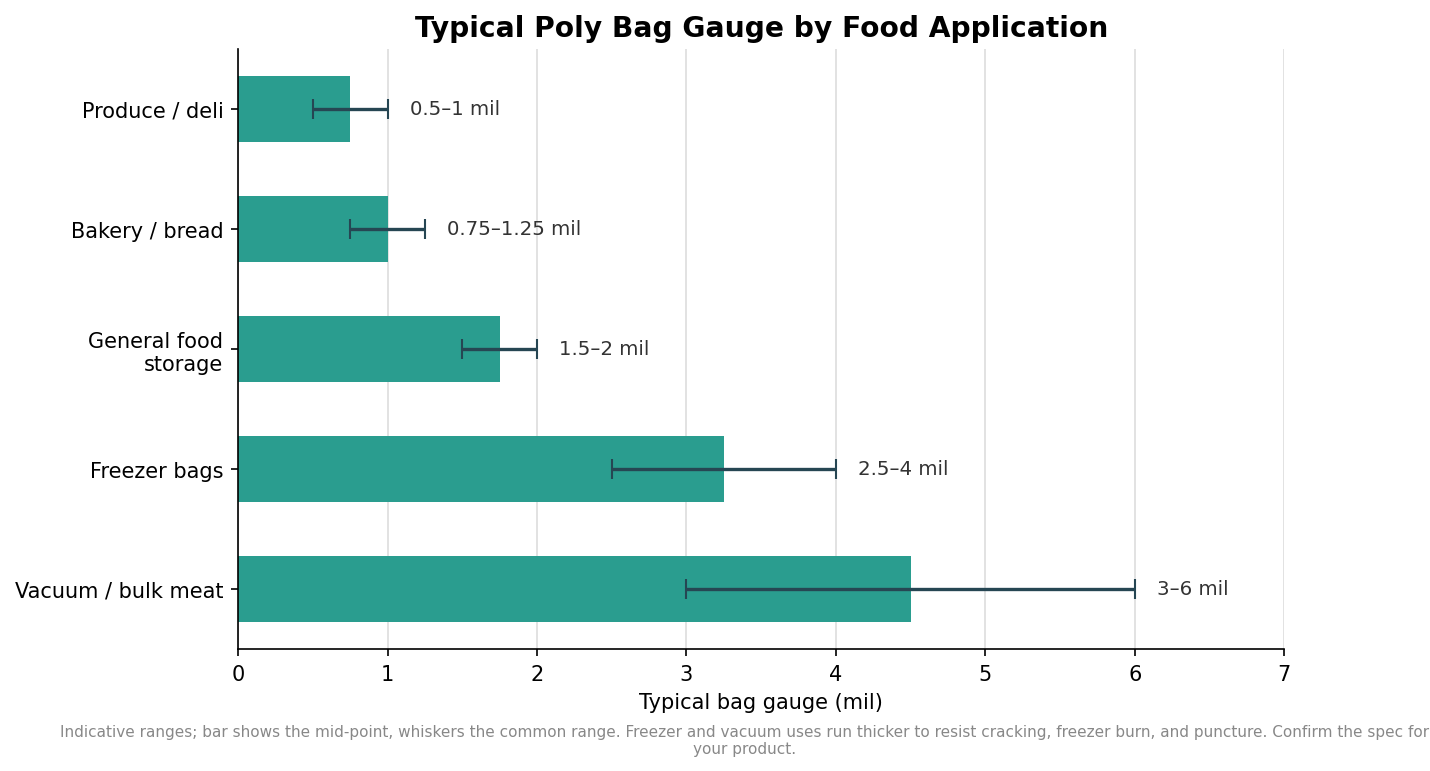
    Bar chart of typical poly bag gauge by food application: produce/deli 0.5-1 mil up to vacuum/bulk meat 3-6 mil, with range whiskers
    Typical gauge bands by food use; freezer and vacuum applications run thicker to resist cracking and puncture.

    Thin films in the half-mil to roughly one-mil range suit produce, deli, and bakery uses where the bag is a light, short-lived wrapper. General food storage tends to sit around one and a half to two mils. Freezer bags step up to roughly two and a half to four mils to resist cracking and freezer burn, and vacuum or bulk applications such as portioned meat run thicker still, commonly three to six mils, to survive handling and the seal. Treat these as starting ranges and confirm the exact gauge against your product weight, edges, and whether the bag is sealed or simply closed, but do not let a supplier quote you a single gauge for wildly different jobs.

    Mistake five: using a bag outside its rated conditions

    A compliant bag is only compliant for the conditions it was made for. Fatty and oily foods interact with plastic differently than dry or watery ones, and the regulation treats those contact conditions separately, so a bag fine for dry goods is not automatically fine for hot, greasy food. The reason the rule cares about all of this is migration, the slow transfer of trace substances from the plastic into the food, which rises with heat, fat, and contact time; the conditions of use in the regulation exist precisely to keep that transfer within safe limits. The other common error is reuse: single-use food bags are validated for a single contact, and washing and refilling them, or microwaving a bag never rated for heat, moves the product outside anything the manufacturer tested. Before you buy, describe the real job to your supplier, including the food type, the temperature range, whether it is fatty, and how the bag closes, so the compliance documentation actually matches how the bag will be used.

    None of this makes ordering food-grade bags hard; it just makes the specification worth writing down. Confirm 21 CFR 177.1520 compliance in writing, insist on virgin resin and food-grade colorants, match the resin to your temperature range and the gauge to your product, and state the real contact conditions. Get those four things on the purchase order and the bag that arrives will be food-safe in fact, not just in name.
  • LDPE vs. HDPE vs. LLDPE: Which Poly Bag Resin You Actually Need

    LDPE vs. HDPE vs. LLDPE: Which Poly Bag Resin You Actually Need

    Two custom bags can carry the same logo, the same dimensions, and the same price on a quote, and still behave nothing alike in a customer’s hand. The reason is the resin underneath the print. Almost every flexible plastic bag is made from polyethylene, but the polyethylene comes in three common grades, and which one you choose decides whether the bag feels crisp and crinkly or soft and glossy, whether it can be run thin without tearing, and how well it takes an ink. This is a materials deep-dive into LDPE, HDPE, and LLDPE, so you can specify the feel you want instead of accepting whatever the factory runs by default.

    One family, three personalities

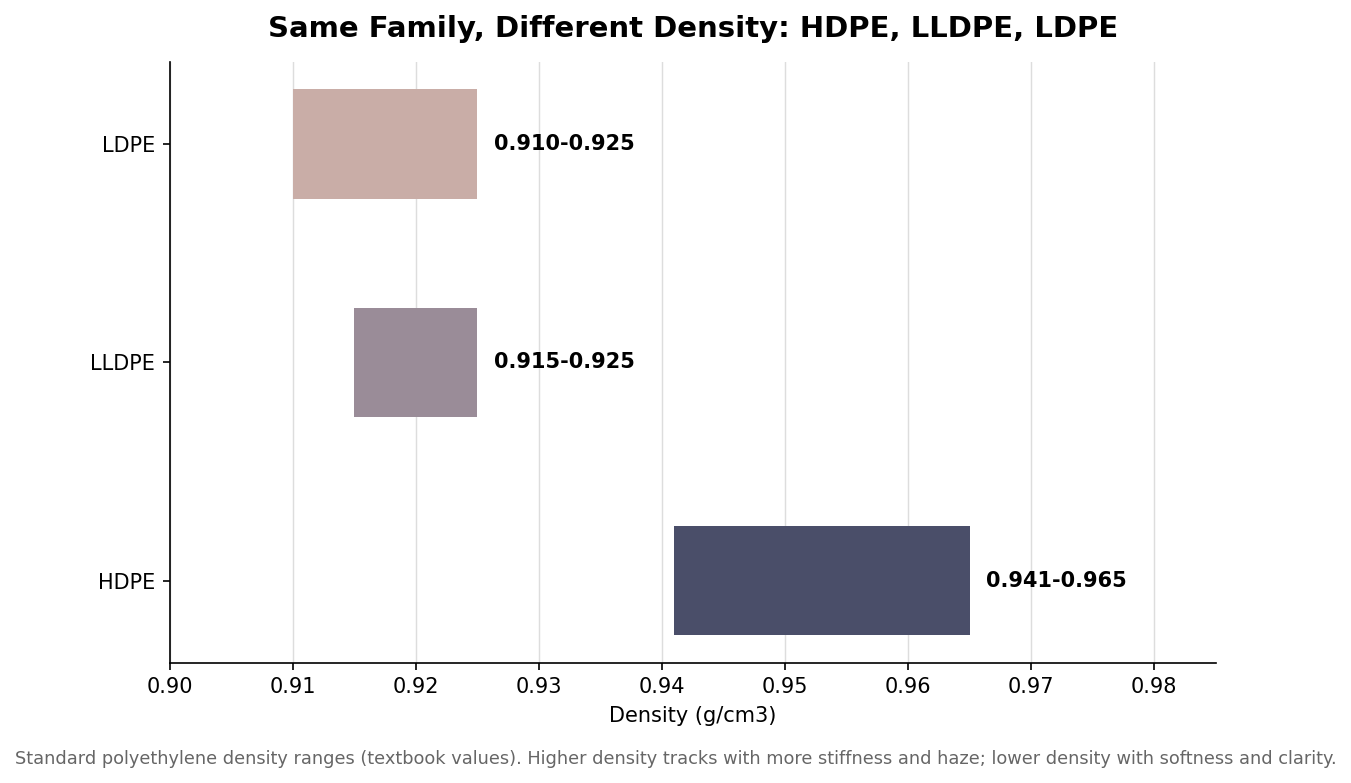
    All three resins are polyethylene, built from the same ethylene building block. What separates them is how the molecular chains are branched and packed, and that packing is measured as density. The tighter the chains pack, the higher the density, and the higher the density, the stiffer and hazier the film. Low-density polyethylene sits at the soft, clear end. High-density polyethylene sits at the stiff, hazy end. Linear low-density polyethylene lands near LDPE on the scale but is engineered for toughness. The density differences look tiny on paper, a few hundredths of a gram per cubic centimeter, but they translate into very different bags.

    Horizontal range bar chart of standard polyethylene density ranges for HDPE, LLDPE and LDPE in grams per cubic centimeter
    The three common bag resins differ mainly by density, which drives stiffness, haze, and clarity.

    Keep that spectrum in mind as we go, because nearly every practical difference in feel, strength, and print traces straight back to it. You are not really choosing between three unrelated plastics; you are choosing where on the density line you want your bag to sit.

    HDPE: stiff, hazy, and thin on purpose

    High-density polyethylene is the crinkly, slightly cloudy film you know from grocery vest bags and produce rolls. Its tightly packed chains give it high tensile strength and rigidity for its weight, which is exactly why it can be run remarkably thin, often well under a mil, and still hold a load. That thinness is a feature, not a corner cut: HDPE’s strength-to-weight ratio lets a bag use less material while carrying groceries or produce reliably. The trade-offs are cosmetic and tactile. HDPE has a matte, hazy look rather than a glassy one, it makes that distinctive rustling sound, and it is stiffer in the hand. For high-volume, function-first bags where cost per bag and load strength matter more than a premium feel, HDPE is usually the right and most economical call.

    LDPE: soft, glossy, and print-friendly

    Low-density polyethylene is the opposite personality. Its branched chains pack loosely, so the film is soft, flexible, and has the best optical clarity and gloss of the three. That glossy, substantial hand is why LDPE dominates retail and merchandise bags, boutique carriers, and thicker poly mailers, where the bag is part of the brand experience and a customer judges quality by touch. The clarity and smooth surface also make LDPE friendly to printing, holding crisp, saturated artwork well. The cost of that softness is strength: LDPE has lower tensile strength than HDPE, so it is typically run thicker, commonly in the one-and-a-half to three mil range for retail bags, to deliver the heft and durability the look implies. You pay in material for the premium feel, which is a fair trade when presentation is the point.

    LLDPE: the toughness in the blend

    Linear low-density polyethylene is the specialist. Its short, uniform branches slide against each other under stress instead of snapping, which gives it the best puncture and tear resistance of the three. In practice, pure LLDPE bags are less common than LLDPE used as a blend component: mixing it into LDPE or HDPE film adds toughness and lets a converter downgauge, running a thinner film that still resists tearing. That is why LLDPE shows up in freezer bags, heavy-duty liners, produce bags, and protective covers, anywhere a bag has to survive sharp contents or rough handling. If your product has corners, edges, or weight that punishes a bag, asking whether an LLDPE blend is available is often the difference between a bag that holds and one that splits at the seam.

    What the resin means for thickness and cost

    Resin and thickness are two separate specifications, and they interact. Because HDPE and LLDPE are strong for their gauge, they let you hit a strength target at a lower mil, which lowers material cost. LDPE, being softer, generally needs more thickness to feel and perform the same way, which raises material cost but buys clarity and a premium hand. This is why comparing two quotes on price per bag alone can mislead: a thin HDPE bag and a thick LDPE bag are solving different problems, and the cheaper number is not automatically the better value.

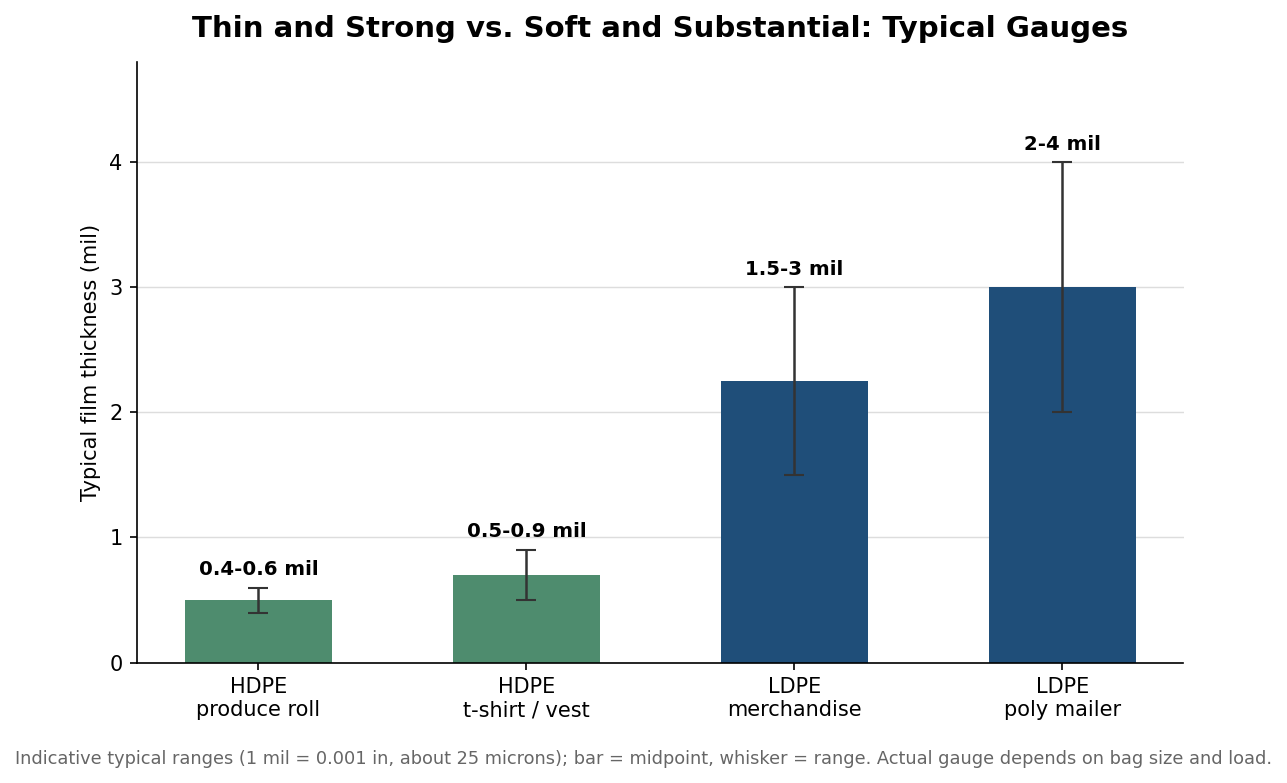
    Bar chart of typical film thickness in mils for HDPE produce and t-shirt bags versus LDPE merchandise bags and poly mailers
    Stronger HDPE runs thin; softer LDPE is run thicker to deliver a premium feel.

    The gauges above are indicative typical ranges, not fixed rules; the correct thickness always depends on bag size, load weight, and how the bag is handled, a decision we walk through in our guide on what gauge you actually need. Treat resin as the first decision and gauge as the second, and confirm both on the order rather than leaving either to a house default.

    Choosing the resin for your bag

    Work backward from the job the bag has to do. If the bag is part of the unboxing or checkout experience and needs to look and feel premium, specify LDPE and accept a thicker gauge for clarity and gloss. If the bag is a high-volume workhorse where cost per unit and load strength lead, HDPE gives you strength thin and cheap, with a hazier, crinklier finish customers rarely mind on a functional bag. If the contents are sharp, heavy, or likely to stress the film, ask for an LLDPE blend to buy puncture and tear resistance, often while shaving thickness. One caution on print: a hazy HDPE surface can mute artwork, so if a bold logo on that stock matters, discuss opaque or white underprints with your supplier, and see our piece on printing a logo on plastic bags without overpaying for how to keep that affordable.

    None of these resins is best in the abstract; each wins a specific job. Name the resin you want on the order, state the gauge separately, and ask your supplier to confirm both. Do that and the bag in the customer’s hand feels the way you intended, rather than the way the cheapest available film happened to feel.

  • How to Size a Plastic Bag: Measuring, Gussets, and the Allowances That Prevent a Reorder

    How to Size a Plastic Bag: Measuring, Gussets, and the Allowances That Prevent a Reorder

    The most expensive mistake in a custom plastic bag order is not the artwork or the gauge. It is a size that looked right on the spec sheet and turns out to be an eighth of an inch too tight around the product, or six inches too short to fold and seal. A bag is not sized to the product; it is sized to the product plus the room the product needs to go in, come out, and close. Getting that arithmetic right the first time is what separates one clean order from a reprint.

    This walkthrough goes in the order you should actually work: measure the item, understand how bag dimensions are stated, add the correct allowances, and decide whether a flat bag or a gusseted one fits the job.

    Start with the product, measured three ways

    Before you touch a bag chart, measure the thing going inside it. You need three numbers: the width of the widest face, the depth front to back, and the height. For a soft or stackable product, measure it as it will actually sit in the bag, compressed or folded the way it ships, not laid out flat. A folded stack of shirts and the same shirts spread on a table are two different depths, and the bag has to fit the first one.

    Depth is the number people forget. Flat items like a single print or document have almost no depth, so a flat bag works. Anything with bulk, a boxed product, a rolled textile, a stack, pushes the front and back panels apart, and that depth has to be accounted for in both the width and the length of the bag. Skip it and the bag will close but strain at the seams, or it simply will not close at all.

    How bag dimensions are actually stated

    Flat poly bags are stated as width by length. Width is measured side to side across the opening, and length runs from the bottom seal to the open end. A bag written as 10 by 12 inches is 10 inches across and 12 inches deep, and the film thickness, the gauge, is a separate spec that does not change those two numbers.

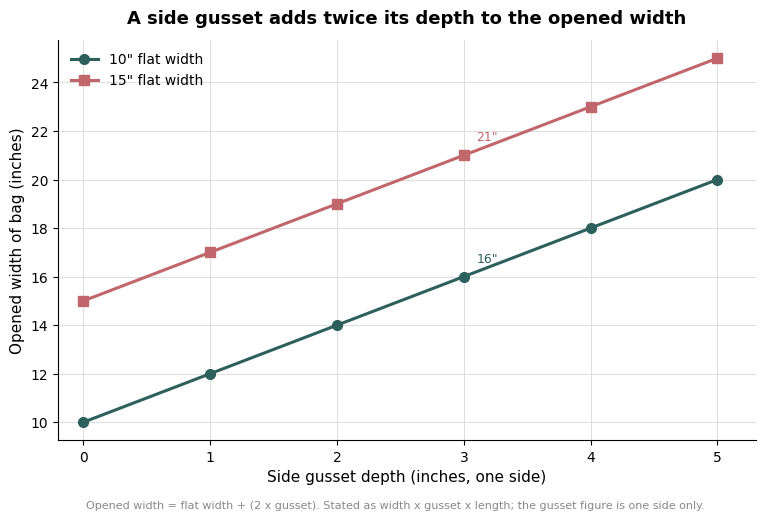
    Gusseted bags add a third figure and are stated as width by gusset by length. The catch that trips up first-time buyers is that the gusset number describes only one side of the fold. A bag listed as 10 by 3 by 12 inches has a 10-inch flat width, but when the sides expand, the opened width is the flat width plus twice the gusset, so 10 plus 6, or 16 inches of usable opening. Read the gusset as one side, double it in your head, and you will never over-order width again.

    Line chart showing opened bag width increasing as twice the side gusset depth for 10 inch and 15 inch flat widths
    Because the gusset figure describes one side, the opened width grows by twice the gusset depth.

    The allowance math that turns a product into a bag size

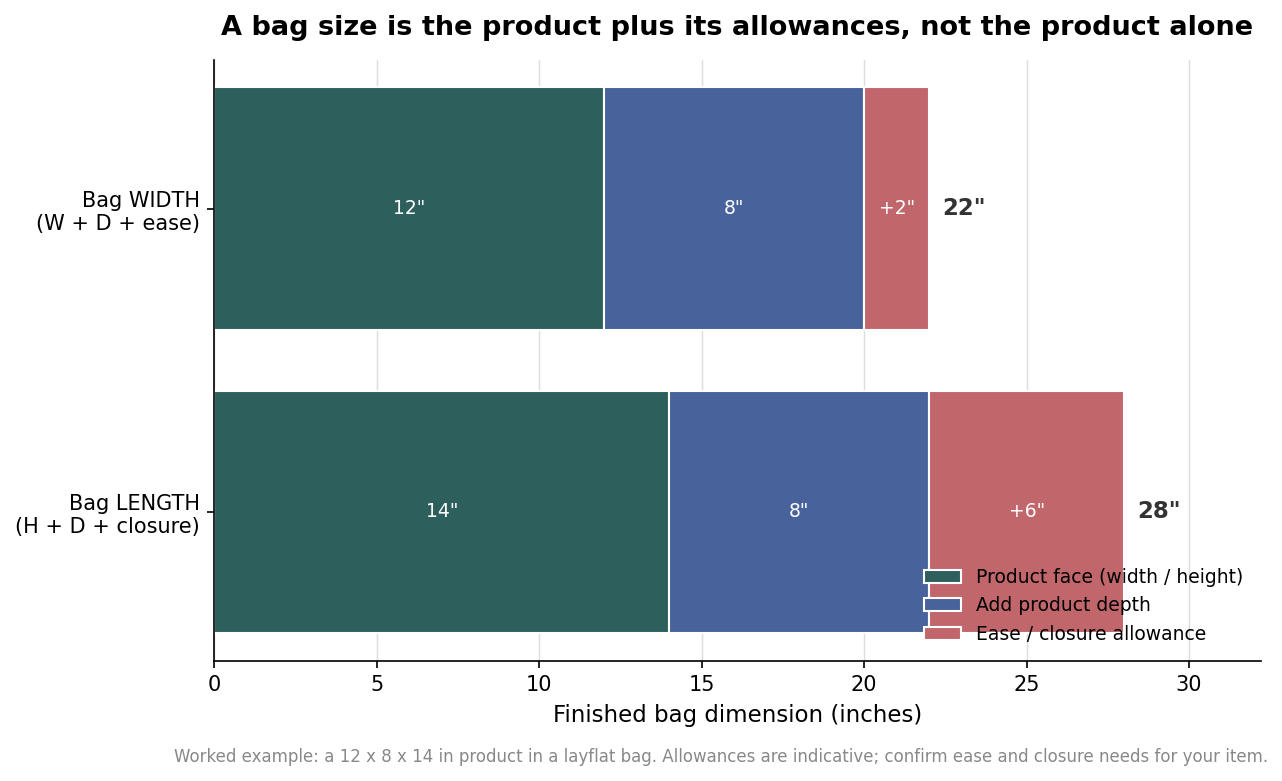
    Once you have the product measured, the bag size is a short addition problem. For a squared-off item in a layflat bag, a workable convention is to set the bag width at the product width plus the product depth plus about two inches of ease, and the bag length at the product height plus the product depth plus roughly six inches to fold over and close. The depth appears in both dimensions because the bag has to wrap around the sides of the item, and the closure allowance at the end is what lets you fold, tape, heat-seal, or tie the top without pulling the film tight against the contents.

    Work an example. A product measuring 12 inches wide, 8 inches deep, and 14 inches high needs a bag roughly 12 plus 8 plus 2, or 22 inches wide, and 14 plus 8 plus 6, or 28 inches long. Notice how far that finished 22 by 28 bag is from the bare 12 by 14 footprint of the product. The allowances are not padding for safety; they are the difference between a bag that seals and one that splits.

    Stacked bar chart showing a finished bag width and length built from product face, product depth, and ease or closure allowance for a 12 by 8 by 14 inch product
    A finished bag dimension is the product face plus its depth plus an ease or closure allowance.

    Treat those specific allowances as indicative rather than fixed. A loose retail bag that only needs to be dropped over a product can run tighter, while a liner meant to be gathered and tied shut needs the full closure allowance. Heat-sealed bags need enough lip above the contents for a clean seal bar. If your closure method is a reclosable lip or an adhesive flap, add that lip length on top of the length you calculated, because the flap is not usable space for the product.

    When a flat bag is not enough

    A flat bag is the right default for thin or flexible goods. As soon as a product has real depth, a gusset earns its place, because it lets the bag expand to a box shape instead of ballooning and wasting film. The same logic scales up to liners. A gaylord or box liner is typically cut to the box width plus about an inch, the box depth plus about an inch, and a length equal to the box height plus the box depth plus around six inches so the liner can be pulled up over the top and closed. The pattern is identical to the small-bag math; only the numbers grow.

    Match the gusset to the product depth, not to a round number. If the item is 6 inches deep, a 3-inch gusset opens to accommodate it, since each side contributes half. Order a gusset far larger than the depth and the excess film just folds back on itself; order one too small and the bag pulls taut and distorts your printed panel. The gusset should track the product, the same way the width and length do.

    A short checklist before you approve the order

    Before a custom bag goes to production, confirm four things in plain numbers. First, that you measured the product as it ships, including its depth. Second, that you read the bag spec correctly, doubling any gusset to picture the real opened width. Third, that your stated bag width and length already include the ease and the closure allowance, so the numbers on the quote are finished bag dimensions and not the product dimensions by mistake. Fourth, that the gauge, which is a separate thickness spec, suits the weight of the contents rather than being an afterthought.

    If you can point to each of those four and say what the number is and where it came from, the bag will fit. Sizing a plastic bag is not complicated, but it is unforgiving of a skipped step, and the depth and closure allowances are the two steps most often skipped. Measure the product honestly, add the room it needs, and specify the finished dimensions, and the first sample off the line will be the one you keep.

  • How to Print a Logo on Plastic Bags Without Overpaying

    How to Print a Logo on Plastic Bags Without Overpaying

    Two orders for the same custom plastic bag can land at wildly different prices, and the artwork usually has more to do with it than the bag itself. The print method, the number of colors, and how the file is prepared decide whether a run comes in clean and affordable or gets bogged down in setup fees and reprints. Here is how to specify a printed bag so the quote matches what you actually need.

    Match the print method to your order size

    Most printed poly bags are produced one of two ways. Flexographic printing uses a raised photopolymer plate for each color, inking the film directly as it feeds through the press. It is the long-standing workhorse for plastic bags because it runs fast and mixes true Pantone spot colors. Digital printing skips plates entirely and lays down CMYK process color straight from the file, which makes short runs cheap and fast but limits you to process color rather than exact spot matches.

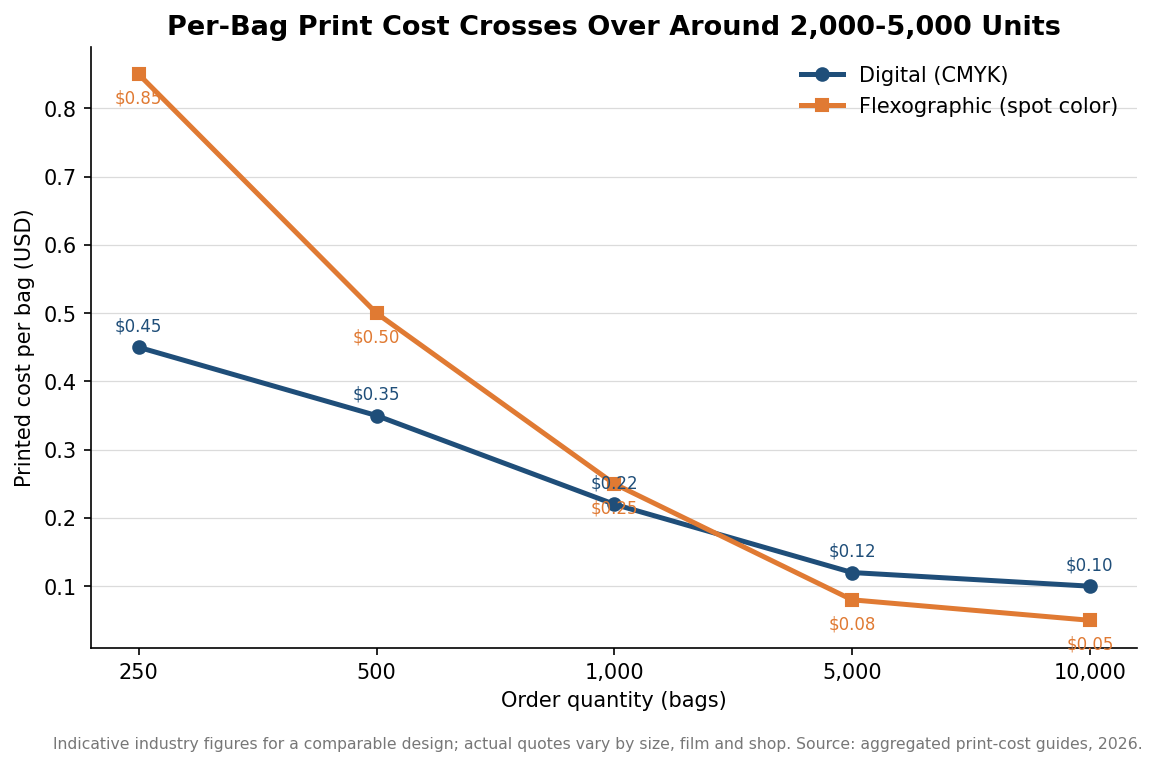
    The practical dividing line is quantity. Digital typically wins under roughly 2,000 bags because there is no tooling to pay off, while flexo pulls ahead once volume climbs past about 5,000 and the plate cost spreads thin across the run. The 2,000-to-5,000 band is a genuine gray zone where you should price both. As a rough guide from published print-cost comparisons, a comparable one-to-two color design ran about $0.45 per bag digitally at 250 pieces versus $0.85 flexo, drew even near 1,000 pieces, and flipped to roughly $0.08 flexo against $0.12 digital at 5,000. Treat those as indicative rather than a quote for your specific bag.

    Line chart comparing per-bag digital and flexographic print cost across order quantities from 250 to 10,000, crossing over around 2,000 to 5,000 units
    Digital wins on small runs; flexographic printing takes over once volume spreads the plate cost thin.

    Minimum order quantities follow the same logic. Digital runs often start around 250 bags because setup is minimal; flexo minimums are commonly higher, in the 500-and-up range, since a shop needs enough volume to justify cutting plates. If you only need a few hundred bags with a simple mark, ask specifically about digital or screen printing rather than assuming flexo is the only option.

    Count your colors before you count anything else

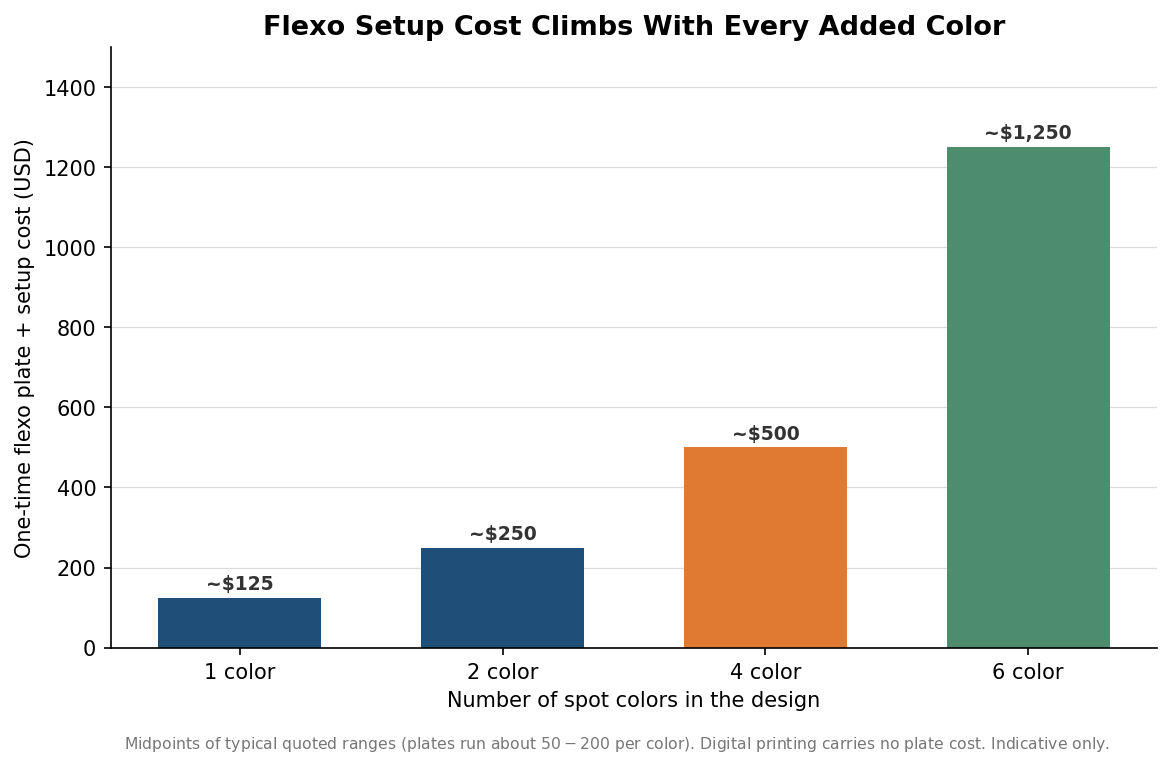
    Every spot color in a flexographic job needs its own plate, and plates are a one-time charge that lands on your first invoice whether you order 500 bags or 50,000. Plate and setup fees commonly run about $50 to $200 per color, so a clean two-color logo carries far less tooling than a four- or six-color design. A single-color print might add a little over a hundred dollars in setup, a four-color job several hundred, and a six-color job can push past a thousand before a single bag is printed.

    Bar chart showing one-time flexographic plate and setup cost rising with the number of spot colors, from about $125 for one color to $1,250 for six
    Each added spot color means another flexo plate, so setup cost climbs quickly with design complexity.

    This is why simplifying artwork is the cheapest lever you have. A logo redrawn to two or three solid spot colors prints crisply on film, holds registration at speed, and keeps setup low. Photographic images and heavy gradients are where flexo struggles and costs climb; if your design truly needs that, digital or gravure is the better conversation. When you request a quote, state the exact number of colors and whether any are metallic or specialty inks, because those change both plates and press time.

    Prepare artwork the press can actually use

    Print shops want vector files for bag work, usually AI, EPS, or a high-resolution PDF with fonts converted to outlines. Vector art scales to any bag size without pixelation and separates cleanly into individual color plates. Supplying a low-resolution JPG or a screenshot of a logo almost always triggers an art charge to rebuild it, and the rebuilt version may not match your brand exactly.

    Specify your colors as Pantone (PMS) references rather than describing them, since “our blue” means nothing to a press operator mixing ink. Build in a small amount of tolerance too: flexo holds registration well but not perfectly, so avoid designs that depend on hairline gaps between two colors lining up exactly. Leave a safe margin around the print area rather than running critical text to the very edge, and ask the shop for its bleed and safe-zone template for the specific bag style you are ordering. Decide early whether you want surface printing, which sits on the outside of the bag, or reverse printing trapped inside a laminated film for a glossier, more protected look, as the latter is only available on certain constructions.

    Build proofs and lead time into the schedule

    Turnaround splits along the same digital-versus-flexo line. A straightforward digital run can move in roughly three to five business days once art is approved, while flexo more often takes about seven to ten because plates have to be made and the press set up and registered. Neither clock starts until you sign off on a proof, so treat proof approval as part of your own timeline, not the printer’s.

    Always ask for a proof, and know which kind you are getting. A digital or PDF proof confirms layout, spelling, and placement but not exact ink color on film; a physical or press proof shows real color on the actual material and costs more. For a first order or a color-critical brand, the press proof is usually worth it. Reputable shops calibrate to tight color tolerances, often a Delta E under 2.0, but that only helps if you have given them a real Pantone target to hit.

    A quick pre-order checklist

    Before you send anything to a printer, confirm five things: your final quantity and how it maps to the digital-or-flexo break-even, the exact number and type of ink colors, vector artwork with outlined fonts and Pantone callouts, the bag style with its bleed and safe-zone template, and the proof type and lead time you need to hit your in-hand date. Nailing those down turns a vague “how much for printed bags?” into a quote you can actually compare across suppliers, and it keeps the surprises off your invoice. Where a figure here is a range or an industry average, ask your supplier to confirm the exact number for your job before you commit.

  • Plastic Bag Laws and What They Mean When You Buy in Bulk

    Plastic Bag Laws and What They Mean When You Buy in Bulk

    For anyone buying bags in bulk, legality has quietly become as real a spec as gauge or print. A bag that is perfect on paper, the right size, a clean four-color print, a comfortable handle, can still be illegal to hand a customer in a growing list of states, and the rules are not the same from one state line to the next. Understanding the shape of the regulation before you place a large order is now part of speccing the bag, not an afterthought. This is general information rather than legal advice, and the rules change often, so treat what follows as a map of the landscape and confirm the current requirement for each place your bags will actually be used.

    A patchwork, not a national rule

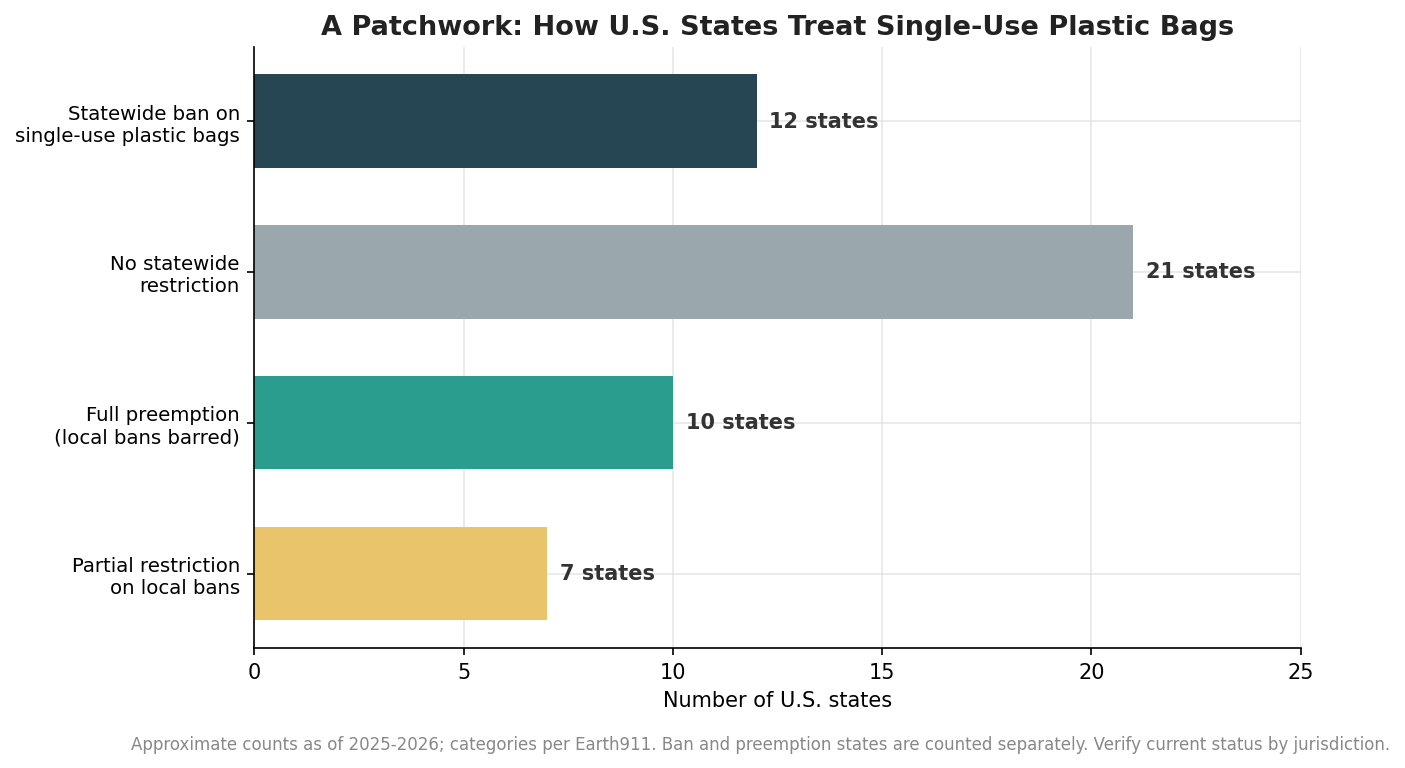
    There is no federal plastic bag law, so the country is a mix of opposite approaches sitting side by side. As of 2025 and into 2026, roughly a dozen states have enacted a statewide ban on single-use plastic carryout bags: California, Colorado, Connecticut, Delaware, Hawaii, Maine, New Jersey, New York, Oregon, Rhode Island, Vermont and Washington. At the other extreme, a comparable group of states runs preemption laws that forbid their own cities from banning or taxing bags at all, keeping thin plastic firmly legal. Between those poles sit states with partial restrictions and states with no statewide rule, where local ordinances may or may not apply. The chart below sketches that split.

    Horizontal bar chart of U.S. states by plastic bag policy: 12 with statewide bans, 21 with no statewide restriction, 10 with full preemption of local bans, and 7 with partial restrictions.
    U.S. plastic bag policy is a patchwork of opposite approaches, from statewide bans to states that bar their own cities from banning bags.

    The practical consequence for a bulk buyer is that a single product can be a compliant staple in one market and contraband in another. If your bags ship to more than one state, or to a national customer, the binding constraint is the strictest jurisdiction in the set, not the average one.

    The thickness line that laws draw

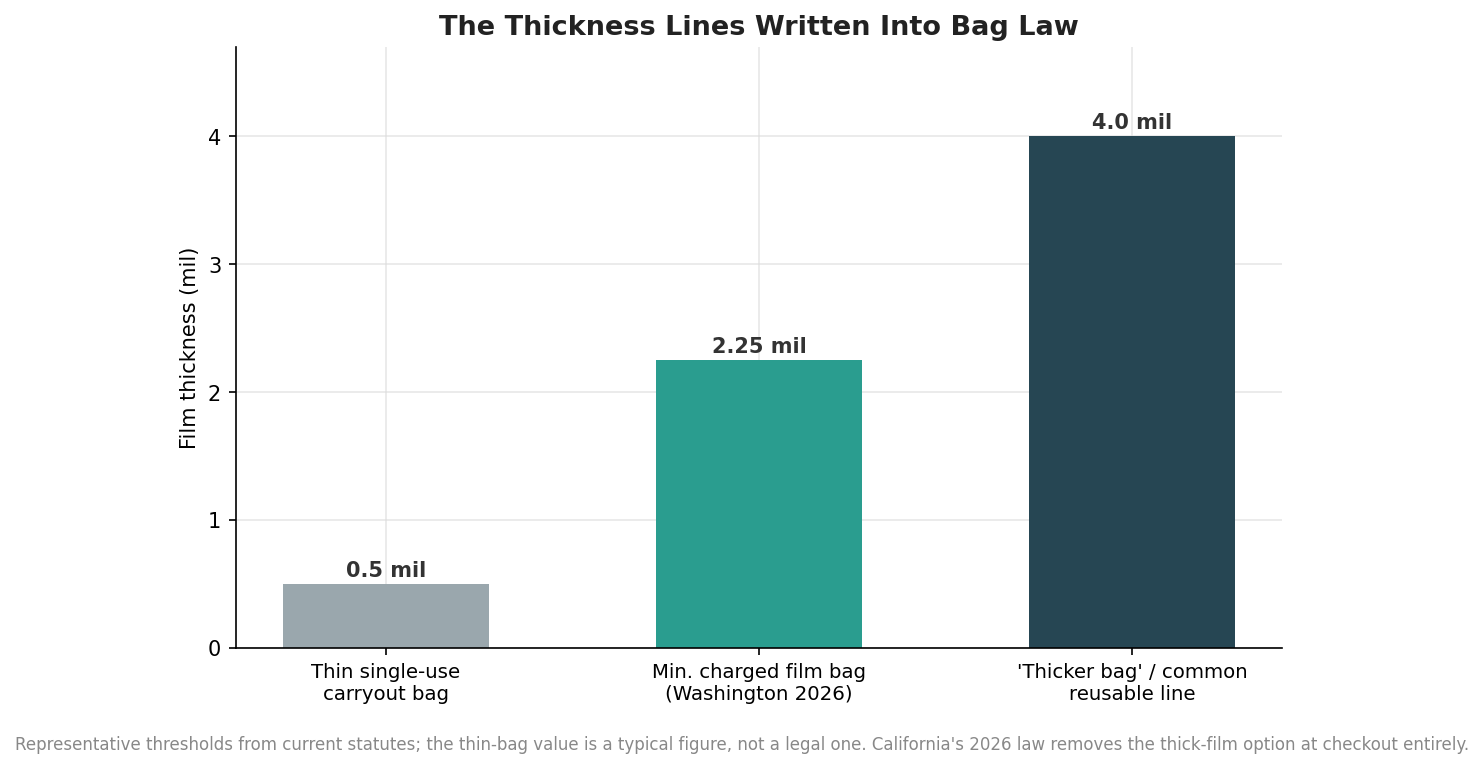
    Where bags are regulated rather than banned outright, the law usually turns on film thickness measured in mils, one mil being a thousandth of an inch. The thin, crinkly carryout bag most bans target sits well under a mil. Many statutes then define a heavier film bag as the charged or reusable alternative above a set thickness. Washington’s rules taking effect in 2026, for example, set a minimum of 2.25 mil for a plastic film bag a retailer can provide for a fee, and treat bags of 4 mil or thicker as a separate, higher-fee category. Those two numbers, 2.25 and 4 mil, recur across several laws as the lines between single-use, reusable film and heavy reusable. If you manufacture or source bags for regulated markets, the target thickness is no longer just a durability decision; it is what determines which legal box the bag falls into.

    Bar chart of film thickness thresholds in bag law: about 0.5 mil for thin single-use bags, 2.25 mil as Washington's minimum charged film bag, and 4 mil as a common reusable line.
    Regulated markets draw the line at film thickness; 2.25 mil and 4 mil recur across statutes as the reusable thresholds.

    Why the “just make it thicker” era is ending

    For years the common workaround to a bag ban was to make the plastic thicker so it qualified as reusable, and keep handing it out. That loophole is now closing where it started. California’s original 2014 law allowed thicker film bags to continue at checkout, and the result was the opposite of the intent: the state reported that bag tonnage rose roughly 47 percent between 2014 and 2022 as shoppers treated the heavier bags as disposable anyway. California’s response, effective January 1, 2026, removes the plastic film option at the register entirely, leaving recycled-content paper as the bag a store can provide. The lesson for buyers is that designing to the thickness loophole is a fragile strategy, because the jurisdictions that opened it are the ones most likely to close it. Building an order around the current minimum in a strict state can leave you holding inventory that a rule change strands.

    Recycled content and paper are part of the spec now

    Thickness is only one axis. A second wave of requirements governs what the bag is made of and what it costs at the counter. Paper alternatives increasingly carry mandated recycled content: California’s incoming rule requires recycled paper bags with a minimum recycled share that steps up over time, and Washington requires recycled content or an agricultural fiber such as wheat straw in its paper bags. Most of these laws also set a minimum charge, commonly in the range of eight to twelve cents per bag, which is a compliance mechanism rather than a price you set. For a bulk buyer this means a modern bag spec often has to state not just size and gauge but material class, recycled-content percentage, and whether the bag is intended to satisfy a reusable or a paper requirement in its destination market. A supplier who can document recycled content is worth more than one who cannot, because that documentation is what proves compliance if anyone asks.

    Speccing bags for a regulated market

    The way through the patchwork is to treat regulation as an input to the order rather than a surprise at the end. Start by listing every state, and where relevant every city, your bags will actually be handed out in, and identify the strictest rule in that set, because that is the one your product has to clear. Decide early whether you are buying to a reusable film standard, a paper standard, or a market that still allows thin plastic, since that choice drives thickness, material and recycled content all at once. Ask suppliers to state the film thickness and any recycled-content figures explicitly on the specification and to back the recycled claim with documentation. Build in a margin against change by leaning toward the more durable requirement when a market is trending stricter, rather than ordering to the current floor. And because these laws move quickly and vary by locality, confirm the present rule for each destination, ideally with the jurisdiction or qualified counsel, before committing a large run. The bag that is easiest to reorder is the one that was specced to the rule, not the one that happened to be legal the month it shipped.

  • What Gauge Do You Actually Need?

    Gauge is the thickness of the film, and it is the specification that decides whether the bag works. It is also the one most often guessed.

    Start with the heaviest sale, not the average

    Bags do not fail on average loads. They fail on the one heavy purchase of the day, in front of the shop, in the rain. Work from the heaviest thing a customer regularly carries out and specify to that.

    If you sell bottles, that is your number. If you sell books, that is your number. If you sell clothes, your bags can be considerably lighter than you think.

    Corners matter as much as weight

    A boxed purchase concentrates load on four points and can puncture a film that would carry twice the weight in soft goods. If your typical sale has corners, step up a gauge or move to a bag with a bottom gusset that lets the box sit flat.

    Under-specifying is expensive in public

    A split bag costs you the bag, sometimes the product, and a small public humiliation outside your own shop. It is the one failure mode where the saving is invisible and the cost is not.

    Over-specifying is expensive quietly

    A bag twice as thick as it needs to be costs materially more per unit and no customer notices the difference. At tens of thousands of bags a year that is a genuine line item bought for nothing.

    Just tell us the load

    The honest short answer is that you should not have to know gauges. Tell us the heaviest thing that goes in the bag and whether it has corners, and we will specify it and say why.

  • Recycled or Compostable? An Honest Comparison

    These are not two grades of the same thing. They are different materials that fail and succeed in different places, and the marketing around both is unusually poor.

    Recycled film

    Polyethylene made partly or wholly from post-consumer waste, typically 30 to 100 per cent. In use it behaves identically to virgin film — the same strength, the same print quality — and it enters exactly the same recycling stream at the end.

    Its advantage is real and unglamorous: it diverts existing waste and reduces virgin plastic production. It does not disappear at the end of its life.

    Compostable film

    A genuinely different material designed to break down in an industrial composting facility — sustained heat, moisture and time. Under those conditions it works exactly as advertised.

    In landfill it does not meaningfully break down, and in a plastic recycling stream it is a contaminant. Its entire value depends on where it ends up.

    So which one?

    Do your customers have access to industrial composting? If yes, compostable is genuinely the better choice and you should say so on the bag. If no, a compostable bag goes to landfill and performs no better than plastic, and recycled film is the honest option.

    That is the whole decision, and it is about infrastructure rather than intent.

    What we will and will not print

    We apply certification marks correctly and we will state recycled content accurately. We will not help print an unsupported environmental claim — those age badly, and regulators are increasingly interested in them.

    If you want the bag to say something true and useful, tell us which material you are on and we will help you word it.

  • Vest, Die-Cut or Soft Loop: Choosing a Carrier Bag Handle

    The handle decides more about a carrier bag than the material does. It sets the speed at the till, the look on the street and the load it can take.

    Vest handles: built for the till

    The two loops let a cashier open a bag one-handed, hook it and fill it without looking. At a busy checkout that is a second or two per customer, which across a day is the entire reason this style dominates grocery.

    It is also the cheapest per bag at volume by a wide margin. The cost is appearance: the handles interrupt the face, so branding has to work around them.

    Die-cut handles: built for the logo

    A hole punched through a folded, reinforced top edge. The face stays flat and unbroken, so a logo sits centred and large and stays legible while the bag swings from a hand.

    The reinforcement is not optional. A die-cut bag without a properly folded top edge tears at the handle every time, and it is the first thing to check on any sample you are sent from anywhere.

    Soft loops: built for weight

    A separate ribbon of film heat-welded to the body. It spreads across the hand instead of cutting into it, and it simply does not fail the way punched handles can.

    This is the choice for boxed purchases, bottles and anything premium. It is also the most expensive bag on the shelf, and it looks and feels like it.

    How to decide in one question

    What is the bag for? Speed: vest. Branding: die-cut. Weight and presence: soft loop. Most shops end up carrying two of the three — a cheap fast bag for small sales and a good one for large ones.

  • Custom Printed Plastic Bags: A Thickness and Material Guide

    Custom Printed Plastic Bags: A Thickness and Material Guide

    Most people ordering a custom printed plastic bag obsess over the artwork and barely think about the two specifications that actually decide whether the bag works: how thick the film is and which plastic it is made from. Get those right and a bag carries its load, survives the trip, and makes your logo look sharp. Get them wrong and you either ship product in a bag that splits at the seam or overpay for industrial-grade film to hold a scarf. This is a plain-language walk through thickness and material, so you can hand a printer a specification instead of a guess.

    What a “mil” actually means

    Plastic bag thickness is measured in mils, and a mil is simply one-thousandth of an inch, or 0.001 inch. It is not a millimeter, which trips up a lot of first-time buyers; one mil is about 0.0254 mm, and for scale a human hair runs roughly two to three mils thick. A related unit is gauge, used mostly for thinner films, where 100 gauge equals one mil. So an 80-gauge film is 0.8 mil, and a 200-gauge film is 2 mil. When a supplier quotes gauge and you think in mils, divide by 100 and you are back on familiar ground.

    Thickness matters because it drives puncture resistance, tear strength, and the way the bag feels in a customer’s hand. Thicker film resists sharp corners and heavy contents, and a heavier bag reads as more premium. The trade-off is cost and material use: every extra mil is more resin per bag. A useful rule from the trade is that when you are genuinely unsure, step up rather than down, because moving from, say, 2 mil to 3 mil adds only a little per bag but a lot of durability.

    How thick is thick enough?

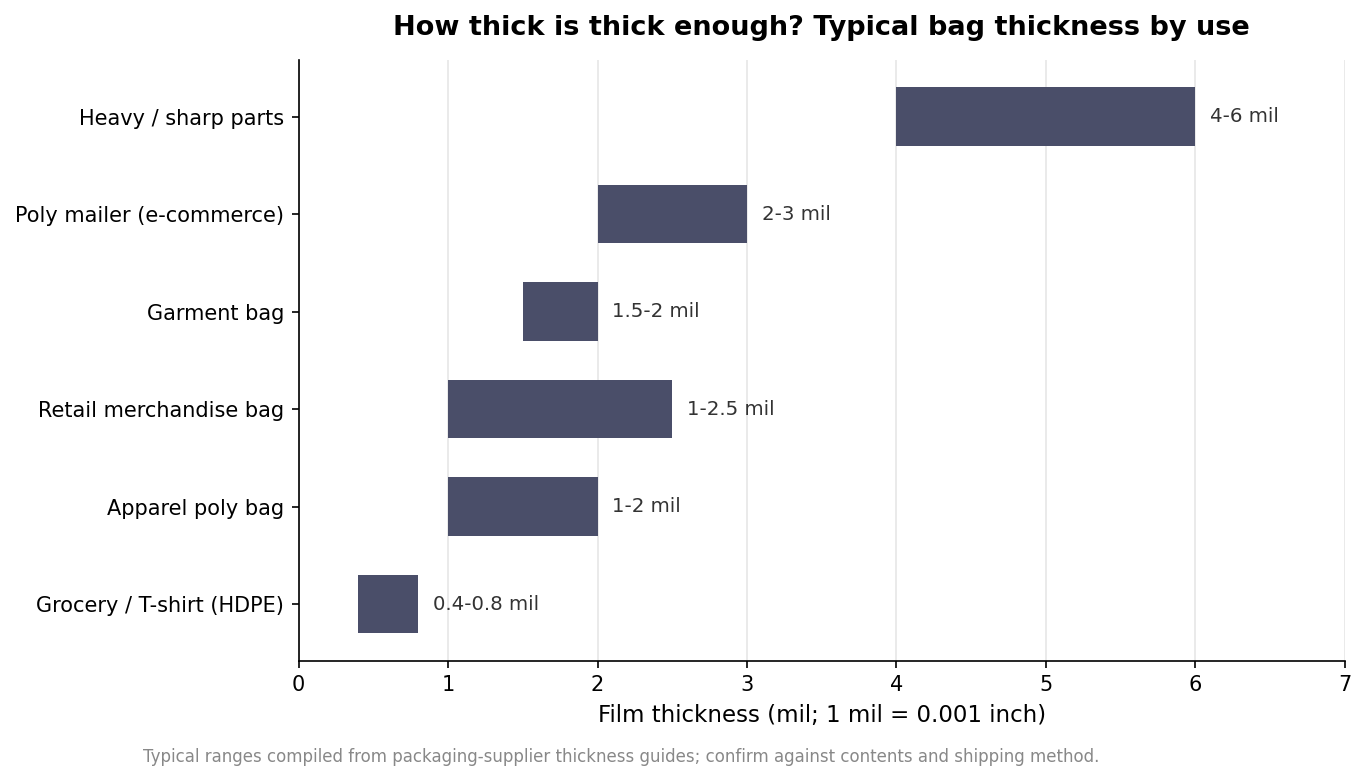
    The right thickness follows the job. For everyday retail, a merchandise or apparel bag in the range of roughly 1 to 2.5 mil is plenty, since the contents are soft and light. A poly mailer for e-commerce typically lands around 2 to 3 mil, thick enough to survive a sorting facility without adding shipping weight. Garment bags sit near 1.5 to 2 mil, and thin grocery or T-shirt style carryout bags, which are made from a stiffer plastic, run much lighter, often well under 1 mil. When you are bagging hardware, tools, or anything with sharp edges, jump to 4 mil or beyond, with the heaviest industrial applications reaching 5 to 6 mil. One compliance note for anyone selling on major marketplaces: platforms such as Amazon require poly bags of at least 1.5 mil and a printed suffocation warning on bags above a certain size, so build that into your spec if it applies.

    Horizontal range bar chart of typical plastic bag thickness in mils by use, from thin grocery bags to 6 mil heavy parts bags
    Typical film thickness climbs with the load and sharpness of the contents.

    LDPE or HDPE: the two plastics you are choosing between

    Almost every plastic bag is polyethylene, but it comes in two families that behave very differently. Low-density polyethylene, or LDPE, is soft, flexible, and glossy, with good clarity and a bit of stretch. It is what most custom poly mailers, merchandise bags, and premium shopping bags are made from, because it takes print beautifully and has a quality hand-feel. It also handles cold well, which is why freezer bags are LDPE; it flexes at low temperature instead of cracking. Its linear cousin, LLDPE, adds even more puncture and tear resistance and often gets blended in for mailers.

    High-density polyethylene, or HDPE, is the crinkly, slightly hazy plastic of grocery and T-shirt bags. It is stiffer and has a higher strength-to-thickness ratio, so it can be made very thin and still carry a surprising load, which is exactly what a high-volume, low-cost carryout bag needs. The trade-off is that it is less clear and less soft, so it looks and feels more utilitarian. As a rule of thumb, choose LDPE when appearance and a premium feel matter, and HDPE when you want maximum strength at minimum thickness and cost.

    Match the bag style to the job

    Thickness and resin combine into a handful of common formats. A poly mailer is a sealed, tamper-evident shipping envelope, best for soft goods and apparel that do not need a box. A merchandise or die-cut handle bag is the flat retail bag you hand a shopper at checkout, prioritizing print area and a comfortable carry over ruggedness. A plastic shopping bag with reinforced handles carries more weight for grocery and big-box use, and a layflat or gusseted poly bag is the plain, open-top bag used to protect or bundle product before it goes in a box. Naming the format up front tells your printer the construction, the handle style, and the sealing method in one word, which removes most of the back-and-forth.

    Printing, food safety, and locking down the spec

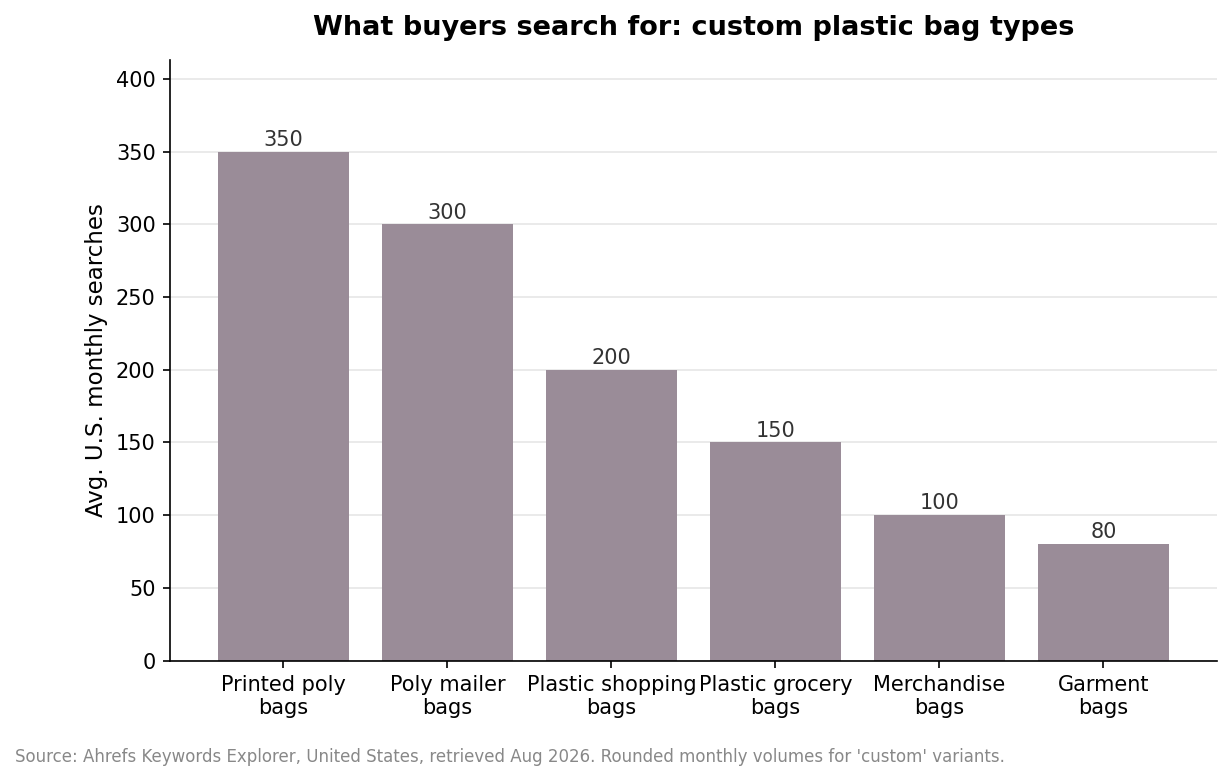
    Custom graphics on poly bags are usually applied by flexographic printing, which lays one to several spot colors of ink directly onto the film and is well suited to logos and bold type. If your bag will touch food, specify a food-grade film made to the relevant FDA standards rather than a general-purpose bag, because not every polyethylene stock is certified for direct food contact. The demand chart below shows which custom bag types buyers are actually searching for, which is a decent proxy for where the everyday use cases cluster. Whatever you are ordering, a complete specification comes down to five answers: the bag style, the size, the thickness in mils, the resin, and the print. Pin those down and you will get bags that fit the product, survive the journey, and show off your brand exactly the way you intended.

    Bar chart of average U.S. monthly searches for custom plastic bag types, printed poly bags highest
    Search demand across common custom plastic bag types (Ahrefs, U.S.).